
Snapchat Snap Kit Tutorial
#About Snap Kit
Snap Kit lets developers like you integrate some of Snapchat’s best features across your platform — and lets your community share their favorite moments from your app with their friends, and Snapchatters across the world! — Snapchat
The following tutorial assumes some familiarity with Xcode, Swift, and Cocoapods
Repository for this tutorial can be found here
#Snapchat Snap Kit Developer Portal ##Step 1 If you don’t have a Snapchat account, register for one . Otherwise you can log in to the portal with your Snapchat credentials.
Creating an app on the portal (really registering for OAUTH keys) is self explanatory.
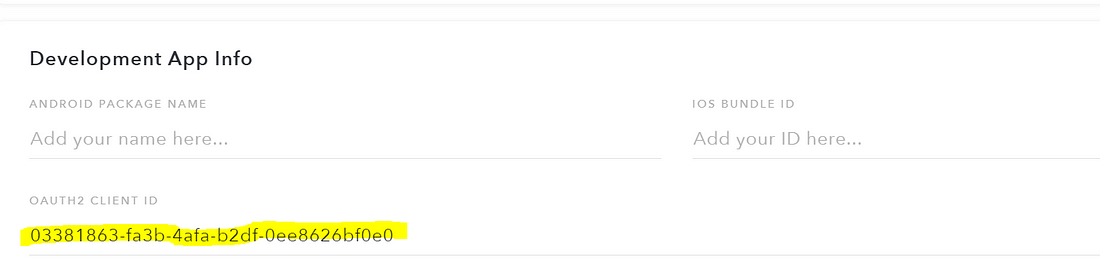
##Step 2
Note / copy the value in Development App Info > OAUTH2 CLIENT ID
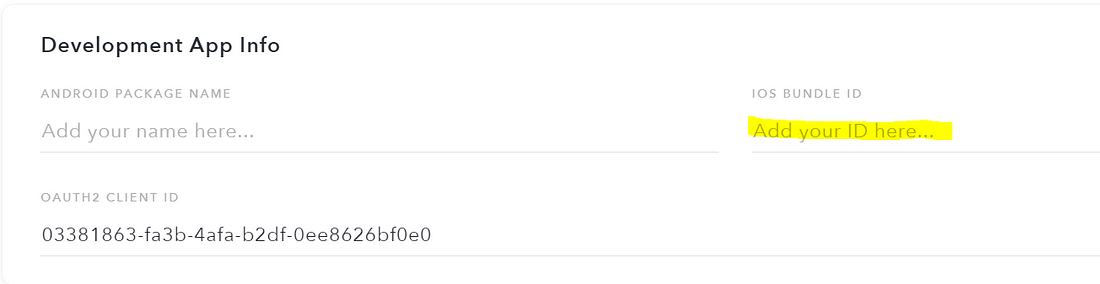
##Step 3 While in the developer portal, add your app’s iOS Bundle ID (See Finding Your App’s Package Name for help)
##Step 4 Add at least one Redirect URL in the section Redirect URLs.
You may choose any URL you wish as long as the URL conforms to these requirements:
- Must be unique (to the world of apps. Perhaps choose your name plus the app name)
- Must be in the format someschemename://somedestination
- Must be the same as the SCSDKRedirectUrl which you will set in your project’s Info.plist (instructions below). In other words, you will copy the value you add to the developer portal and paste it into Info.plist later in these instructions

#Snap Kit SDK ##Step 5 Initialize your project for cocoapods and add SnapSDK
pod 'SnapSDK', :subspecs => ['SCSDKLoginKit', 'SCSDKCreativeKit', 'SCSDKBitmojiKit']
Then run
pod install
#Info.plist Skip to the bottom of this section if you just want to get to the gist.
##Step 6 The SCSDKRedirectUrl and the CFBundleURLSchemes are related, as well as the value of the Redirect URL you added in the Snapchat Developer Portal.
The values can be completely made up. As long as the values match and are unique (see below). For example, if my app is named This Crazy App I could set these values:
<key>CFBundleURLSchemes</key>
                <array>
                    <string>thiscrazyapp</string>
                </array>
And
<key>SCSDKRedirectUrl</key>
        <string>thiscrazyapp://myapp</string>
Then you would add thiscrazyapp://myapp to the Snapchat Developer Portal in the Redirect URLs section by clicking the Add button to the right
A note from a snapchat dev:
The redirect URL itself doesn’t need to have any meaning associated with it — so in general, the only real criteria would be to pick a URL with a scheme that is unlikely to collide with a scheme of another app. If your app already has a URL scheme that it uses, then you’d probably just want to reuse that. Otherwise, a URL scheme of yourfirstandlastname might work well for you. In your case then, you may want to use the redirect URL yourfirstandlastname://snap-kit/auth The string value for SCSDKClientId is the OATH2 CLIENT ID from the developer portal.
The LSApplicationQueriesSchemes would also need to be added to a new Info.plist.
LSApplicationQueriesSchemes (string-array): This should contain snapchat, bitmoji-sdk, and itms-apps.
<key>LSApplicationQueriesSchemes</key>
	<array>
		<string>itms-apps</string>
		<string>snapchat</string>
		<string>bitmoji-sdk</string>
	</array>
Add all three SCSDKScopes (there is really no good reason not to)
Login Kit offers the following scopes:
- https://auth.snapchat.com/oauth2/api/user.external_id: Grants access to a stable user ID specific to your app
- https://auth.snapchat.com/oauth2/api/user.display_name: Grants access to the user’s Snapchat display name
- https://auth.snapchat.com/oauth2/api/user.bitmoji.avatar: Grants access to the user’s Bitmoji avatar; toggleable by user
<key>SCSDKScopes</key>
	<array>
		<string>https://auth.snapchat.com/oauth2/api/user.external_id</string>
		<string>https://auth.snapchat.com/oauth2/api/user.display_name</string>
		<string>https://auth.snapchat.com/oauth2/api/user.bitmoji.avatar</string>
	</array>
Info.plist gist:
#Login Kit
##Step 1 Anyplace you need the Login Kit code (such as the initial ViewController)
import SCSDKLoginKit
##Step 2 This code needs to be added in the AppDelegate.swift file.
func application(_ app: UIApplication, open url: URL, options: [UIApplicationOpenURLOptionsKey : Any] = [:]) -> Bool {

        return SCSDKLoginClient.application(app, open: url, options: options)
    }
#Step 3 Choose a login button and the code that goes along with it
Snapchat Official Login Button
Position the official button as you like in code
let loginButton = SCSDKLoginButton()
Custom Login Button
Consult the Snapchat Design Guidelines for button UI
@IBAction func loginButtonTapped(_ sender: Any) {
    SCSDKLoginClient.login(from: self, completion: { success, error in

        if let error = error {
            print(error.localizedDescription)
            return
        }

        if success {
            self.fetchSnapUserInfo() //example code
        }
    })
}
Snapchat does not gather much data from users:
- User ID (A Snapchat internal generated value)
- Display Name (User’s chosen display name)
- Bitmoji (Avatar, if user has created one) Notice there is no ability to gather email address or real name.
Use SDSDKLoginClient.fetchUserData to get the user data. The code below is one of many approaches to parsing the values returned.
private func fetchSnapUserInfo(){
    let graphQLQuery = "{me{displayName, bitmoji{avatar}}}"
    SCSDKLoginClient
        .fetchUserData(
            withQuery: graphQLQuery,
            variables: nil,
            success: { userInfo in
                if let userInfo = userInfo,
                    let data = try? JSONSerialization.data(withJSONObject: userInfo, options: .prettyPrinted),
                    let userEntity = try? JSONDecoder().decode(UserEntity.self, from: data) {
                    DispatchQueue.main.async {
                        self.goToLoginConfirm(userEntity)
                    }
                }
        }) { (error, isUserLoggedOut) in
            print(error?.localizedDescription ?? "")
    }
}
##Step 4 For logout or “unlink”
SCSDKLoginClient.unlinkCurrentSessionWithCompletion { (success: Bool) in
  // do something
}
#Creative Kit
 Users must be logged into Snapchat to use Creative Kit’s features in your app
##SCSDKSnapPhoto and SCSDKPhotoSnapContent Pass photos to the Snapchat app
SCSDKSnapPhoto is a photo that the user can get from the camera, photo library, or your app and pass to Snapchat. This class lets you initialize images that users can share to Snapchat.
SCSDKPhotoSnapContent is an implementation of the SCSDKSnapContent protocol. It provides a way to model a photo Snap for sharing to Snapchat.
See Snapchat iOS API Reference
import SCSDKCreativeKit
// Copied from Snapchat Documentation

/* Main image content to be used in the Snap */
let snapImage = /* Set your image here */
let photo = SCSDKSnapPhoto(image: snapImage)
let photoContent = SCSDKSnapPhotoContent(snapPhoto: photo)
// Alternately, you can set the photo using a URL
let photo = SCSDKSnapPhoto(imageUrl: snapImageUrl)
Pass a photo with a caption, sticker and url
You can choose to add a caption, sticker, or URL attachment to a set photo or video.
Conditions
- Only one sticker is allowed.
- A still sticker must be a PNG 1MB or smaller.
- An animated sticker must be a GIF or WebP (preferred) 1MB or smaller.
- Captions are limited to 250 characters.
- The attachment URL must be a properly formatted URL in string format.
// Copied from Snapchat Documentation (modified for clarity)

/* Stickers to be used in Snap */
let stickerImage = /* prepare a sticker image */
let sticker = SCSDKSnapSticker(stickerImage: stickerImage)
/* Alternatively, use a URL instead */
// let sticker = SCSDKSnapSticker(stickerUrl: stickerImageUrl, isAnimated: false)
// Caption
snap.caption = "This is a caption"
// URL
snap.attachmentUrl = "https://myawsomeappurl.com"
##SCSDKSnapVideo and SCSDKVideoSnapContent
Pass a video to the Snapchat app. Stickers, captions and URLs follow the same patterns as above for photos. See Snapchat Creative Kit Documentation
let videoUrl = /* prepare a local video URL */
let video = SCSDKSnapVideo(videoUrl: videoUrl)
let videoContent = SCSDKSnapVideoContent(snapVideo: video)
Sending your photo, video, or sticker to Snapchat The final step is connecting to Snapchat. Use the SCSDKSnapAPI interface to let your users start sending their creations to Snapchat:
let api = SCSDKSnapAPI(content: snap)
api.startSnapping { error in

    if let error = error {
        print(error.localizedDescription)
    } else {
        // success

    }
}
#Bitmoji Kit
 ##Get Bitmoji (Snapchat avatar)
Users must be logged into Snapchat to use Bitmoji Kit’s features in your app
##Get Bitmoji (Snapchat avatar)
Users must be logged into Snapchat to use Bitmoji Kit’s features in your app
See also Snapchat’s official Bitmoji Sample App
import SCSDKBitmojiKit

let iconView = SCSDKBitmojiIconView()
###Sticker Picker
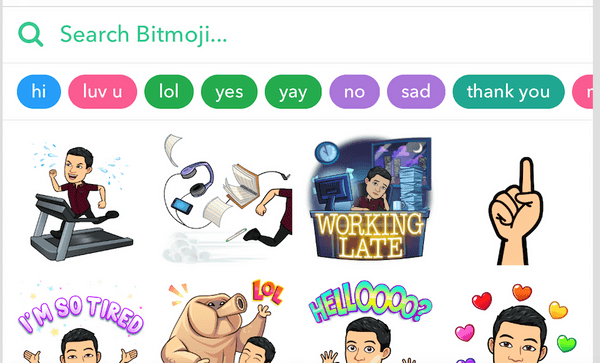
To add the sticker picker UI, create a sticker picker view, and add a delegate to be notified whenever a user selects a sticker:
// Code sample copied from Snapchat docs
import SCSDKBitmojiKit

override func viewDidLoad() {
   super.viewDidLoad()
   ...
   let stickerPickerVC = SCSDKBitmojiStickerPickerViewController()
   stickerPickerVC.delegate = self

   addChildViewController(stickerPickerVC)
   view.addSubview(stickerPickerVC.view)
   stickerPickerVC.didMove(toParentViewController: self)
   ...
}

func bitmojiStickerPickerViewController(_ stickerPickerViewController: SCSDKBitmojiStickerPickerView, didSelectBitmojiWithURL bitmojiURL: String) {
   // do something
}

// Optional delegate method for listening to search field
// focus changes
func bitmojiStickerPickerViewController(_ stickerPickerViewController: SCSDKBitmojiStickerPickerView,
                                        searchFieldFocusDidChangeWithFocus hasFocus: Bool) {
   // do something
}
OR
The code below retrieves the bitmoji to set in the scene

//Code contained in this article's sample app
extension CameraViewController: SCSDKBitmojiStickerPickerViewControllerDelegate {
    func bitmojiStickerPickerViewController(_ stickerPickerViewController: SCSDKBitmojiStickerPickerViewController, didSelectBitmojiWithURL bitmojiURL: String) {
        bitmojiSelectionView?.removeFromSuperview()
        if let image = UIImage.load(from: bitmojiURL) {
            DispatchQueue.main.async {
                self.setImageToScene(image: image)
            }
        }
    }
    func bitmojiStickerPickerViewController(_ stickerPickerViewController: SCSDKBitmojiStickerPickerViewController, searchFieldFocusDidChangeWithFocus hasFocus: Bool) {
    }
}
##Story Kit
 Story Kit is in Beta as of this post date 08/21/18
#I Need Love
Did you like this post? Hearts, Unicorns, Bookmarks and Shares make me happy!
#Contact:
- @saganone1
- Medium - Adventures in iOS Development
- Codementor.io
- Sagan.one
- Patreon
- Quora
- Blog
- GitHub
- Dev.to
References